No-Bake Easter Cheesecake Bites Kids Will Love
- Rao

- Apr 18
- 9 min read
Updated: Apr 27

Easter weekend is already full of sugar: the eggs come out, the baskets appear, and somehow, by midday, there are chocolate wrappers everywhere. But there's still something lovely about having a proper little dessert on the table that took a bit of thought, even if it didn't take much effort. These no-bake Easter cheesecake bites are exactly that.
They come together in about 20 minutes, they don't need an oven, and children can genuinely help make them, which makes them a nice Easter holiday activity as much as a recipe. The base is simple crushed biscuits (graham crackers in the US, digestives in the UK), the filling is cream cheese and a little whipped cream, and on top, you can decorate them as simply or as elaborately as the kids want.
I make these when the baby is napping, and I want something ready for the Easter table that looks sweet without being complicated. They go into the fridge to set while I get on with other things, and come out looking properly festive.
No-bake Easter cheesecake bites are a little celebration of the long weekend, and they're one of the most practical ways to make that happen. They work. I promise.

Why This Recipe Actually Works for Busy Moms 💛
🐣 No oven required: everything is mixed and chilled; no baking, no timing, no risk of burning
⏱️ 20 minutes of active work: then the fridge does the rest. You can make these hours ahead.
👧 Kids can genuinely help: crushing biscuits, pressing bases, and decorating are all child-appropriate tasks
🧀 Only 5 main ingredients: cream cheese, cream, biscuits, butter, and icing sugar
🐣 Easter decorations make them festive: mini chocolate eggs, pastel sprinkles, or even just a little pastel-coloured cream on top
💷 Very budget-friendly: cream cheese is affordable, and the recipe goes a long way
🥡 Make ahead: they actually need to set in the fridge for at least 2 hours, which makes them perfect for preparing ahead of an Easter lunch or dinner
🍰 Feels special without stress: they look prettier than they are difficult
Ingredients You'll Need for These No-Bake Easter Cheesecake Bites
Nothing fancy here, just simple ingredients that work hard.
For the Biscuit Base:
1½ cups (150g) digestive biscuits or graham crackers, crushed to fine crumbs
5 tablespoons (70g) unsalted butter, melted
1 tablespoon icing sugar (powdered sugar)
For the Cheesecake Filling:
1½ cups (340g) full-fat cream cheese, at room temperature
⅓ cup (40g) icing sugar (powdered sugar), sifted
1 teaspoon vanilla extract
½ cup (120ml) double cream or heavy whipping cream, cold
To Decorate:
Mini chocolate Easter eggs (the small foil-wrapped or sugar-coated kind)
Pastel-coloured sprinkles or hundreds and thousands
Optional: a tiny nest made from shredded coconut tinted pale green with a drop of food colouring, this takes two minutes, and children love it
Optional: a little whipped cream piped on top if you want them to look extra special
A note on cream cheese: Full-fat cream cheese is important here. The lower-fat version has more water in it and can make the filling too soft and loose to hold its shape properly. The full-fat version is what gives you that firm, sliceable cheesecake texture.
A note on the cream: Make sure the double cream is cold before you whip it — it won't whip properly at room temperature. Pop it in the freezer for 5 minutes if your kitchen is warm.
Optional Swaps:
Use gluten-free biscuits or cookies for a gluten-free version
Swap double cream for a dairy-free whipping cream and cream cheese for a dairy-free alternative if needed
A teaspoon of lemon zest in the filling adds freshness and cuts through the richness beautifully
Equipment needed: A 12-hole muffin tin, paper cupcake liners, a piping bag (or a zip-lock bag with a corner snipped), and a hand mixer or stand mixer. That's everything.
How to Make No-Bake Easter Cheesecake Bites: Step-by-Step Instructions
Step 1: Line a 12-hole muffin tin with paper cupcake liners. This makes them much easier to remove cleanly.
Step 2: Crush the biscuits until they're fine crumbs. A zip-lock bag and a rolling pin are the easiest method, and children find it extremely satisfying. Mix the crumbs with the melted butter and icing sugar until they look like damp sand.
Step 3: Spoon about one tablespoon of the crumb mixture into each liner. Press down firmly with the back of a spoon or your fingertips to create an even, compact base. Place the tin in the fridge while you make the filling.
Step 4: In a large bowl, beat the cream cheese with the icing sugar and vanilla extract until smooth and fluffy. This works best with an electric hand mixer; it takes about 2 minutes. Scrape down the sides of the bowl.
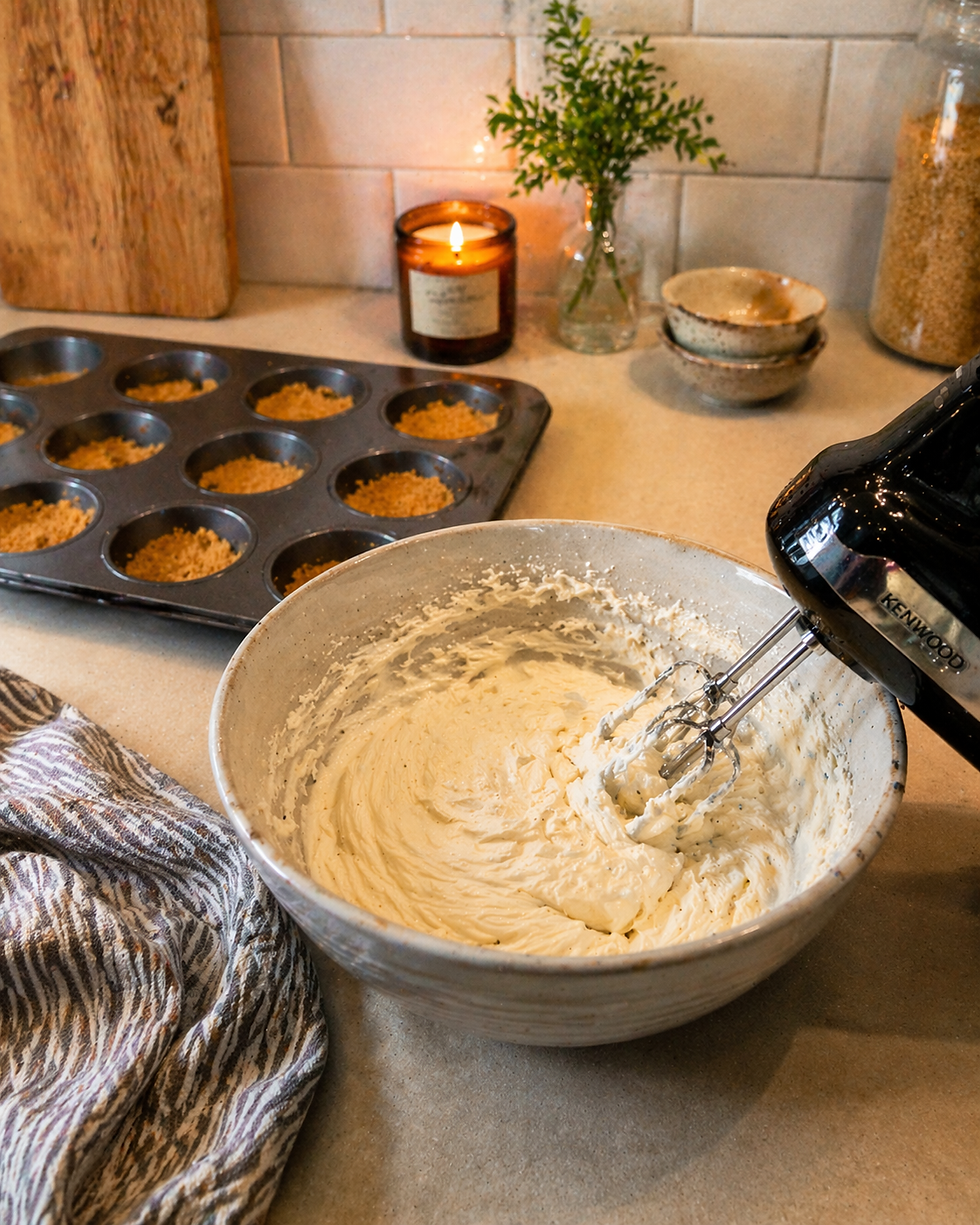
Step 5: In a separate bowl, whip the cold double cream until it holds soft peaks, not stiff, just gently billowing. Fold the whipped cream into the cream cheese mixture in two additions, using a large spoon or spatula. Fold gently to keep the mixture light and airy.
Step 6: Spoon or pipe the filling into the lined muffin tin over the biscuit bases. Fill each one almost to the top. Smooth the surface with the back of a spoon.
Step 7: Refrigerate for at least 2 hours, or overnight. The cheesecake needs to firm up in the cold. If you try to decorate too early, the filling will be too soft.
Step 8: Decorate just before serving. Place 2–3 mini Easter eggs on each one. Add sprinkles, a little nest of green-tinted coconut, or a swirl of whipped cream. This is the part that the children can take charge of completely.
Common Mistakes & How to Avoid Them
Using cold cream cheese. Cream cheese straight from the fridge is stiff and lumpy and won't beat smoothly. Take it out 20–30 minutes before you start. Room temperature cream cheese becomes perfectly smooth in two minutes with a mixer.
Over-whipping the cream. Cream that's over-whipped becomes grainy and can turn into butter. Stop at soft peaks when you lift the beaters and the cream holds a gentle, slightly floppy shape. Fold it gently into the cream cheese; don't stir vigorously.
Not pressing the base firmly enough. A loose, sandy base will crumble when you lift the cheesecake bite out of the liner. Press firmly with the back of a spoon until the crumbs compact and hold together. Give it a few firm taps with your palm.
Decorating before they're set. If the filling hasn't had time to firm up in the fridge, the eggs will sink, and the topping will slide. Two hours minimum, longer if you can manage it.

Helpful Cooking Tips
Sift the icing sugar. Unsifted icing sugar can have lumps that don't dissolve properly in the cream cheese, leaving little white specks in the filling. It takes ten seconds to sift and gives you a smoother result.
Taste the filling before chilling. It should taste sweet but with a clear cheesecake tang from the cream cheese. If it tastes too sweet, add a small squeeze of lemon juice. If it needs more sweetness, add a little more sifted icing sugar. Adjust before it goes into the fridge.
Use a piping bag for neater filling. It's not essential, but piping the filling into the liners gives a cleaner, more even result than spooning. A zip-lock bag works just as well. Fill it, snip one corner, and pipe.
Make a double batch. This recipe makes 12 bites, which disappear very quickly at an Easter gathering. A double batch with two tins takes almost no extra time and is much more practical.
Chill overnight if possible. The texture firms up significantly overnight compared to the 2-hour minimum. If you're making these for Easter lunch, making them the evening before gives the best result.
Tips, Swaps & Make-Ahead Options
Easy Ingredient Swaps
Gluten-free: Use gluten-free digestive biscuits or any gluten-free cookie that blitzes to a fine crumb
Dairy-free: Use dairy-free cream cheese and dairy-free double cream (most major supermarkets stock both). The texture is slightly softer but still sets well if chilled overnight.
More lemon flavour: Add the zest of one lemon to the filling, which becomes a lemon cheesecake bite, which is lovely for spring
Chocolate base: Use chocolate digestives instead of plain ones for a chocolate-and-cream-cheese combination that children love
Make-Ahead, Storage & Reheating
These are ideal for making ahead; they need fridge time anyway. Make them up to 24 hours before serving and store in the muffin tin covered loosely with cling film. Add the decorations just before serving.
Leftovers store in an airtight container in the fridge for up to 3 days. The biscuit base will soften slightly over time, but the flavour remains good.
These don't freeze well; the cream filling becomes watery when defrosted. Make fresh and eat within 3 days.
Kid-Friendly Tweaks
Let children choose their own toppings from a selection of sprinkles, mini eggs, and small marshmallows
Individual portions in their own liner mean no sharing disputes
Use smaller liners (mini muffin tin) for tiny children who can't finish a full-sized bite
For very young children, skip the decorative mini eggs, which can be a choking hazard and use only sprinkles
Serving Ideas for Real Life
Easter Sunday dessert: Set out a plate of these alongside whatever else is on the Easter table. They look pretty and taste genuinely good; no one will know they took 20 minutes.
Easter baking activity: Set up a decorating station with all the toppings in small bowls and let children decorate their own. This is genuinely fun and produces very little mess.
Edible Easter gifts: Place 2–3 in a small box or clear bag with a ribbon for a homemade Easter treat that's much nicer than a shop-bought one.
After the main Easter meal: These are light enough to eat after a full Easter dinner, they're small, and the cream cheese filling isn't too heavy.
With a spring drink: A glass of sparkling lemonade or a cup of tea on the side makes this feel like a proper afternoon tea moment.
Frequently Asked Questions
Can I make no-bake Easter cheesecake bites the day before?
Yes, and you should. They set better overnight, and the base firms up nicely. Make them the evening before Easter and decorate in the morning.
Why is my cheesecake filling too soft?
Either the cream cheese was still cold when you started, the cream was over-whipped, or they haven't had enough time in the fridge. If the filling is soft after mixing, don't panic. Chill for 3–4 hours, and it will firm up.
Can I make a large cheesecake instead of individual bites?
Yes. Press the base into a 7-inch (18cm) springform tin and pour the filling on top. Refrigerate for 4 hours or overnight, then decorate and serve in slices.
How do I get the cheesecake bites out of the tin cleanly?
The paper liners do all the work, just lift by the edges of the liner. If you've skipped the liners, run a thin knife around the edge of each one before gently pressing up from the bottom.
Are these safe for young children?
Yes, with some adjustments. The mini chocolate eggs on top can be a choking hazard for very young children; replace them with sprinkles. The filling itself is fine for children over 12 months.
Can I use light cream cheese? Technically, yes, but the filling will be softer and may not set as firmly. Full-fat cream cheese gives a much more reliable, creamier result.
More Cozy Recipes You Might Like
Easy Easter Lamb Meatballs the Whole Family Will Love
Cozy Strawberry Lemonade Mocktail for Spring Evenings
Creamy Spring Pasta Primavera in 30 Minutes
📋 Quick Recipe Card
No-Bake Easter Cheesecake Bites
Prep time: 20 minutes
Chill time: 2 hours minimum
Total time: 2 hours 20 minutes
Makes: 12 bites
Ingredients (Base): 1½ cups digestive biscuit crumbs, 5 tbsp melted butter, 1 tbsp icing sugar
Ingredients (Filling): 1½ cups full-fat cream cheese (room temperature), ⅓ cup sifted icing sugar, 1 tsp vanilla extract, ½ cup cold double cream
Decorations: Mini Easter eggs, pastel sprinkles, optional whipped cream or green coconut nest
Instructions:
Mix biscuit crumbs with melted butter and icing sugar. Press into lined muffin tin holes. Refrigerate.
Beat cream cheese, icing sugar, and vanilla until smooth. Separately whip cold cream to soft peaks. Fold cream into cream cheese mixture.
Spoon or pipe filling into each muffin hole over the biscuit base.
Refrigerate for a minimum of 2 hours (overnight is best).
Decorate with Easter eggs and sprinkles just before serving.
Easter baking doesn't have to mean hours in the kitchen. These cheesecake bites are the kind of treat that looks like you tried harder than you did, and the fact that children can make most of them themselves is a bonus that makes the whole thing feel more like an occasion.
I hope they end up on your Easter table this year. Leave a comment below and let me know what decorations your children chose. I love that part. Save the recipe now and come back to it when the long weekend arrives.


Comments